
The Mac’s Contacts app is incredibly useful for storing personal and work contact info. Here’s how to back up your Contacts database.
macOS’s Contacts app lives in the /Applications folder at the root of your Startup Disk. When you add new Contacts, each page, or vCard is stored in a local database on disk at ~/Library/Application Support/AddressBook (the Contacts app was called “Address Book” in earlier versions of macOS).
There are several files and folders in the AddressBook folder but the main Contacts database will be named “AddressBook-vXX.abcddb” – where “XX” is some version number – in the case of macOS Ventura, usually “22”. The .abcddb file type is an opaque type and Apple doesn’t publish the specifications for it.
However, at the same level is a folder named “Metadata”, and in this folder are individual Contacts, one for each entry in the Contacts app. Currently, these files have an extension of “.abcdp” and you can double-click any one of them to open the corresponding entry in the Contacts app.
If you’re not syncing your Contacts to iCloud, the AddressBook folder contains your entire Contacts database. Settings for the Contacts app are stored in ~/Library/Preferences/com.apple.AddressBook.plist.
One easy way to back up your Contacts database is to simply copy the entire AddressBook folder by holding down the Option key and clicking and dragging it to another storage location in the Finder. On any new macOS installation, you can simply drop the AddressBook folder into the same location in the user’s Library folder to restore your Contacts database to the new installation.
If you also want to also copy your Contact app’s settings to a new macOS install, simply copy the com.apple.AddressBook.plist file mentioned above to the same location on the new Startup Disk. You’ll be asked to replace both items each time, to which you should click “Replace” in the Finder when asked.
Once you’ve copied everything over to the new installation, Restart the Mac. Then open the Contacts app. You should see all your Contacts entries in the app. If you don’t, there’s a way to restore your backed-up Contacts, which we’ll get to below.
But first, there’s another way to back up your entire Contacts database from within the Contacts app. To do so, first be sure you’ve selected “All Contacts” at the top of the sidebar on the left side of the Contacts main window:
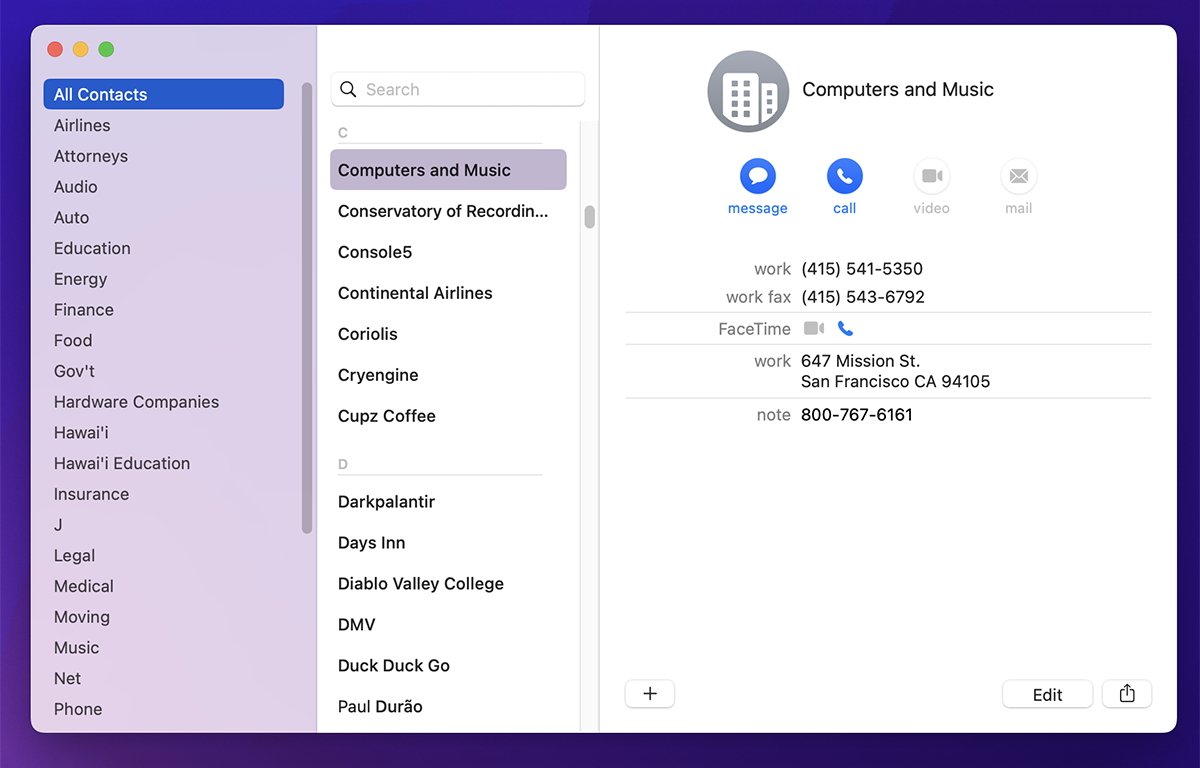
Be sure to select “All Contacts” in the sidebar.
Next, choose “File->Export->Contacts Archive” from the main menu. A standard save panel will appear. Select a file name, and a location and click the “Save” button.
Contacts archive export files are saved with a file extension of .abbu (for Address Book Back Up), and are given a default name of “Contacts – ” followed by the current date. For example:
Contacts – 05-16-2023.abbu
The .abbu export file contains an entire archive of all the contacts in your Contacts app – assuming you clicked the “All Contacts” item at the top of the sidebar before exporting.
Be aware of one long-standing intermittent bug in the Contacts export feature which Apple still has yet to address: if you export the .abbu file to your Mac’s Desktop, on some occasions an incomplete archive will be saved and some individual contacts may be lost.
The conditions under which this bug occurs are still not fully understood – and it only happens sometimes.
To be safe, simply never save the exported archives to the Mac’s Desktop. Ever.
Always save it to some other location on a drive. Hopefully Apple will fix this issue in Contacts soon.
You can tell if this bug has happened because if you save the entire Contacts database to an .abbu file on the Desktop and then save it again to another location on disk, you’ll notice a significant difference in files sizes between the two files in Finder Get Info windows.
This tells you some Contacts were lost in the file with the smaller size.
Once you’ve exported the .abbu file, make a second copy of it in a safe location – preferably on media not usually connected to your Mac.
You can also back up single Contacts in the Contacts app, or Contact groups in the sidebar. To do so, simply click a Contact entry or group in the Contacts list or sidebar, and Control-click or right-click.
A context popup menu appears with an “Export vCard” item in it:
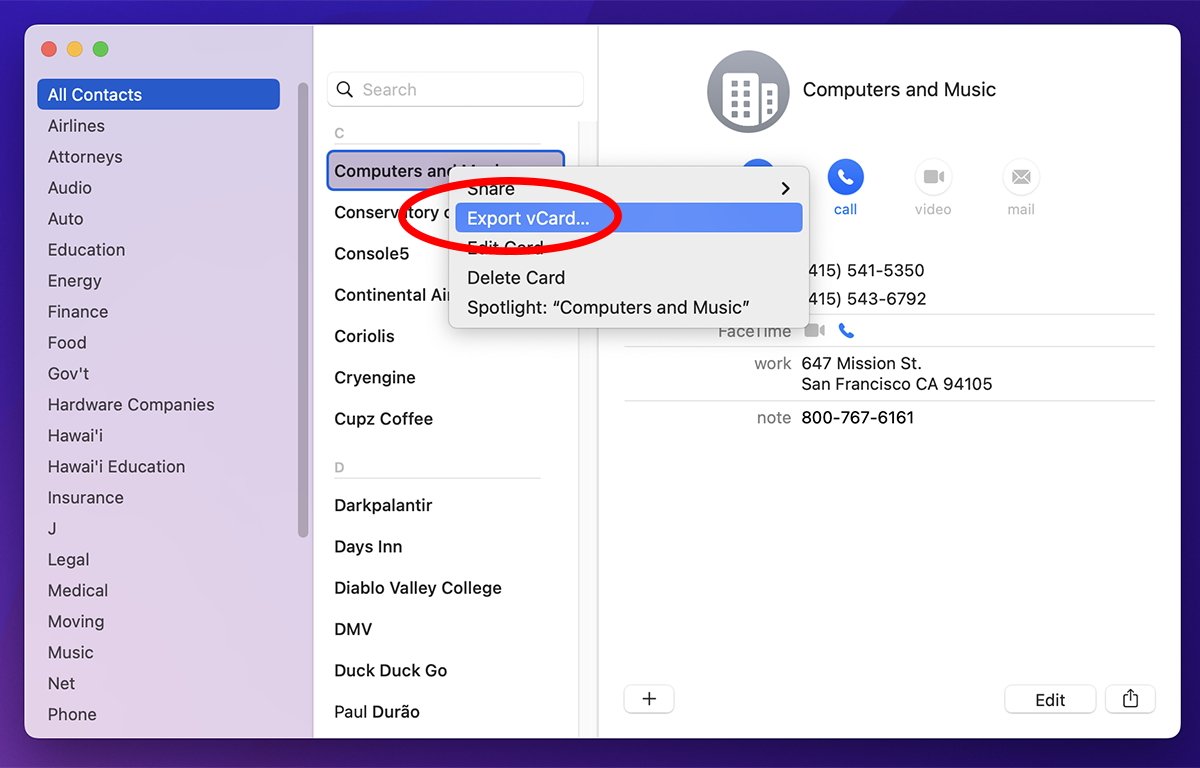
Select “Export vCard…”.
Select the item and save the vCard using the standard save panel. vCards are an open contacts format which are part of the CardDAV standard.
Most modern operating systems and apps support vCards. In macOS, vCards are saved with a file extension of .vcf.
In “Contacts->Settings” you can also choose which version of the vCard standard to use under the “vCard” tab: currently versions 2.1 and 3.0 are supported.
You can export and import vCards at will to add or share contacts from the Contacts app. There’s also a “File” menu item to export a vCard or group to a PDF file.
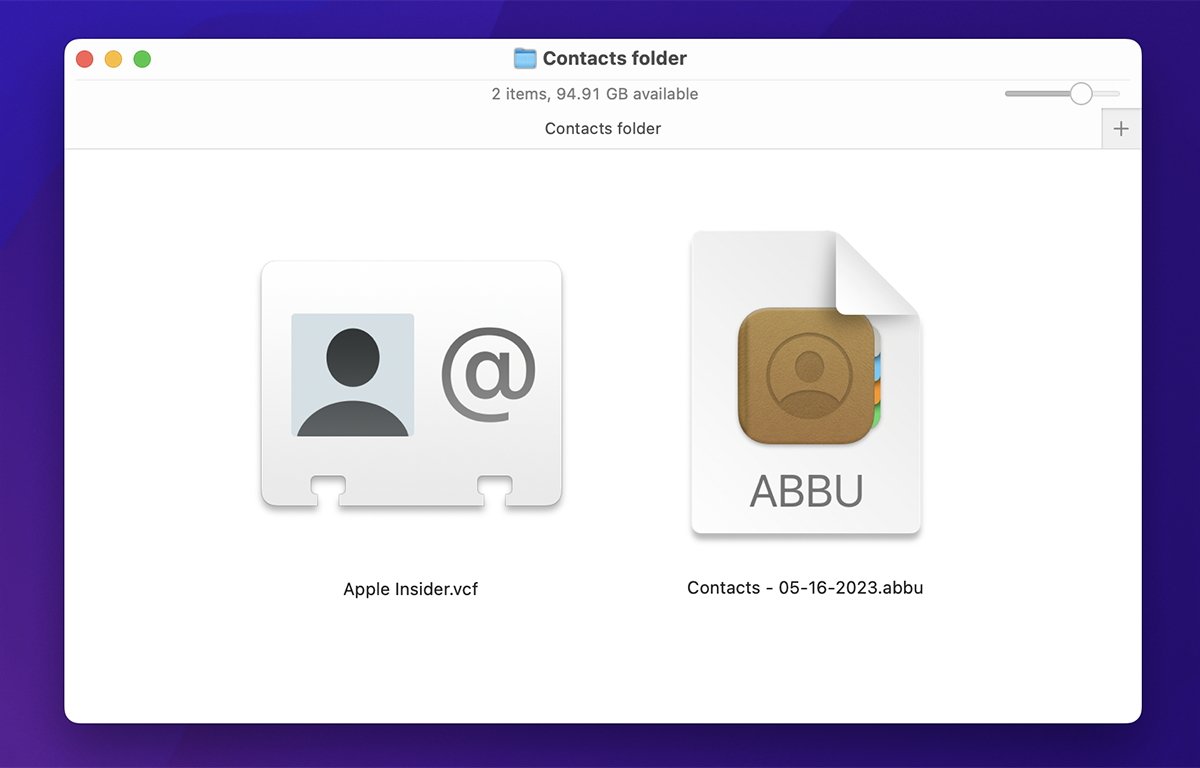
A vCard, left, and an exported Contacts archive file.
To restore your entire exported Contacts backup, select “File->Import”, and select any .abbu file from the standard open panel that appears. You’ll be asked if you want to replace existing Contacts with the contents of the opened file.
Click “Replace All” to replace your existing Contacts database with the one contained in the file.
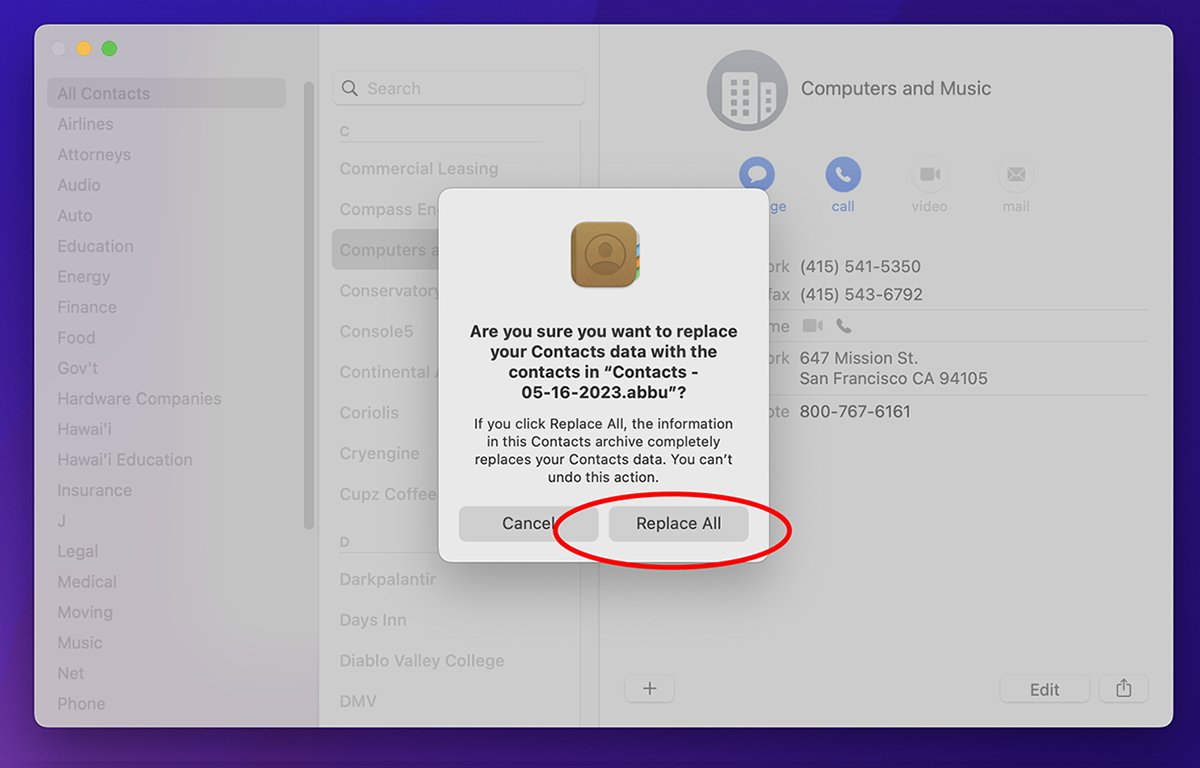
Importing an .abbu file.
Use this feature with caution as it will completely overwrite any existing Contacts you currently have stored in the Contacts app. You only get one warning. There is no Undo.
You can restore or import any vCard or vCard group simply by double-clicking any .vcf file in the Finder. If the vCard already exists in Contacts, it will jump to that card. If not, it will add the card or group of cards and then jump to the first one.
If you double-click multiple vCards in the Finder, Contacts will ask if you really want to import that many cards. Click the “Import” button to import them all.
You can also click the “Review Duplicates” button to review any possible duplicate cards before importing them.
To save indiviudal Contacts to iCloud, first go to “Contacts->Settings”, and in the “General” tab, select “iCloud” as the “Default Account”:
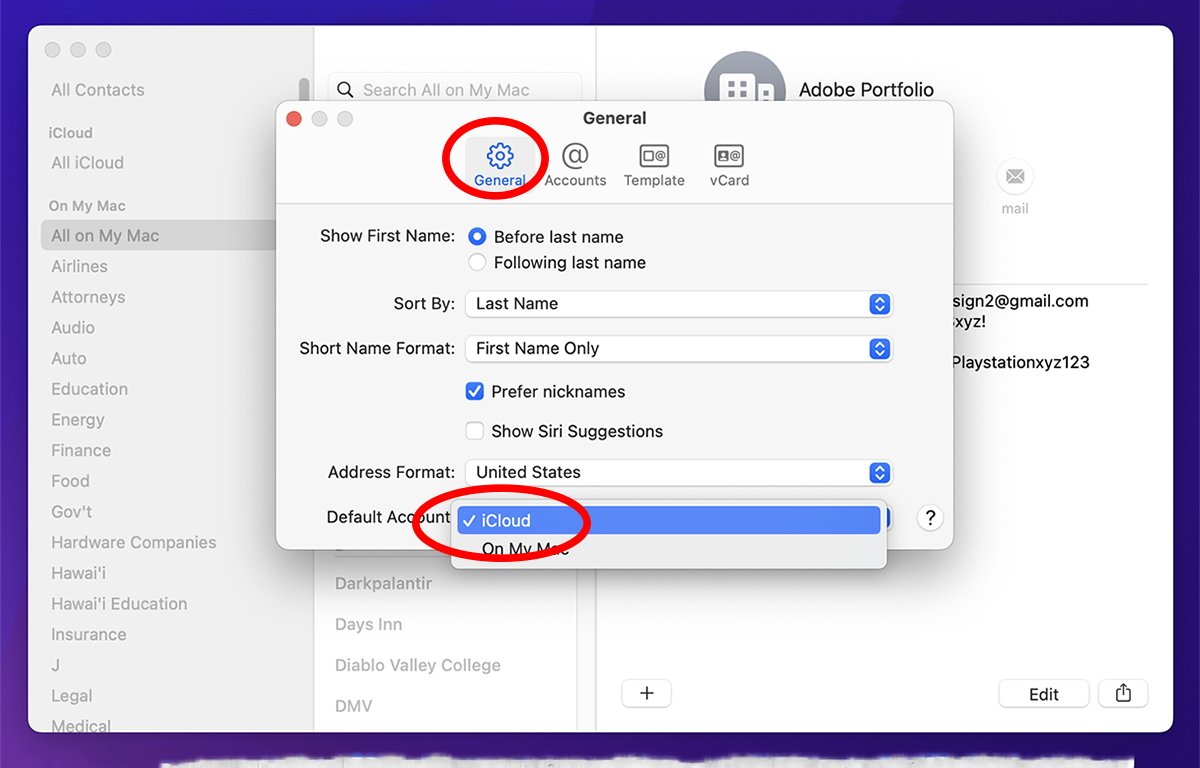
Select “iCloud” as the Default Account in Settings.
When you do this, Contacts adds a “iCloud” heading in the main window’s sidebar. Any Contacts you add under the “iCloud” heading will automatically be synced to iCloud.
The headings in the Contact app’s main window sidebar work the same way they do in Apple’s Notes app: there’s one section for local items on your Mac, and another for iCloud items. Where an item ends up is simply based on which heading you store it under.
You can also move Contacts entries or groups simply by dragging them from one section to another in the sidebar.
If you go back to the “Contacts->Settings” window, you can turn off the iCloud sidebar header section again simply by choosing “On My Mac” for the “Default Account”. If you do so, it doesn’t delete any existing Contacts under the “iCloud” header in the sidebar, it merely hides them.
In order for Contacts to be saved to iCloud, you must enable it in macOS’s Settings app. To do so, select “Finder->Settings” in the main menu, click your Apple ID at the top of the window, log in if necessary, then select “iCloud” on the right. On the next pane, click the “Show All” button on the right side of the window to show all apps that support iCloud:
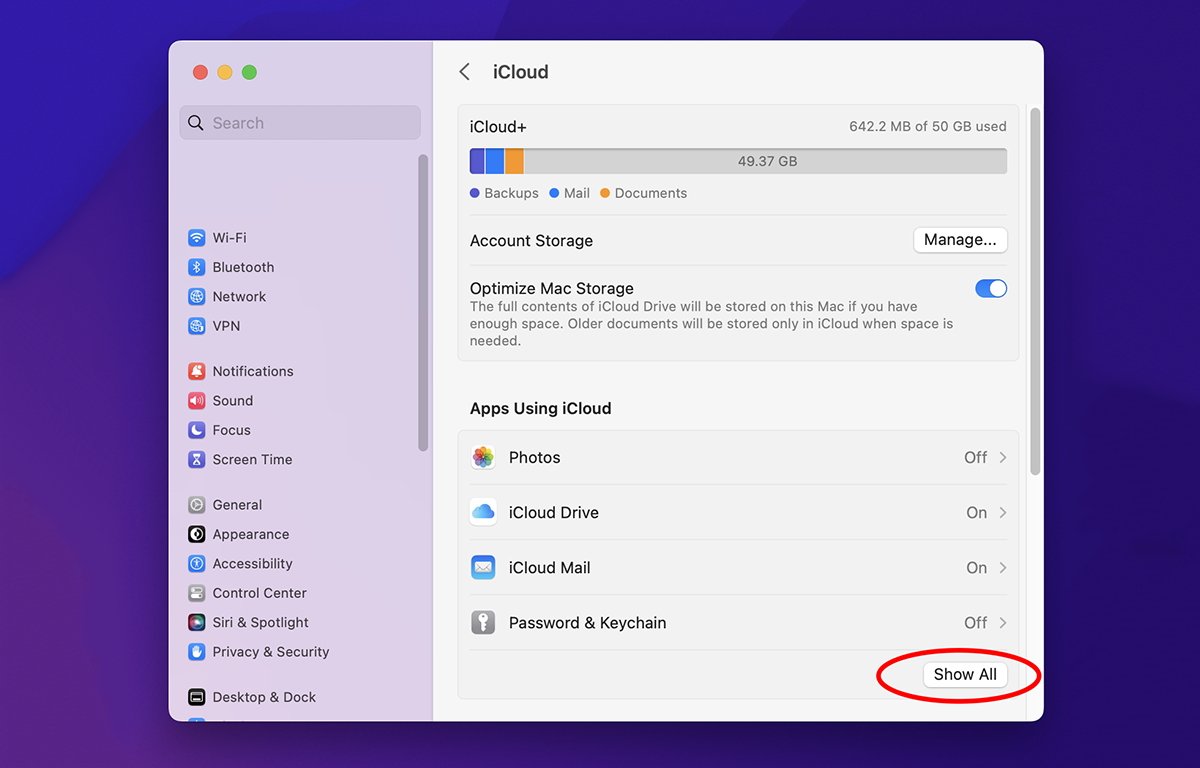
Click “Show All”.
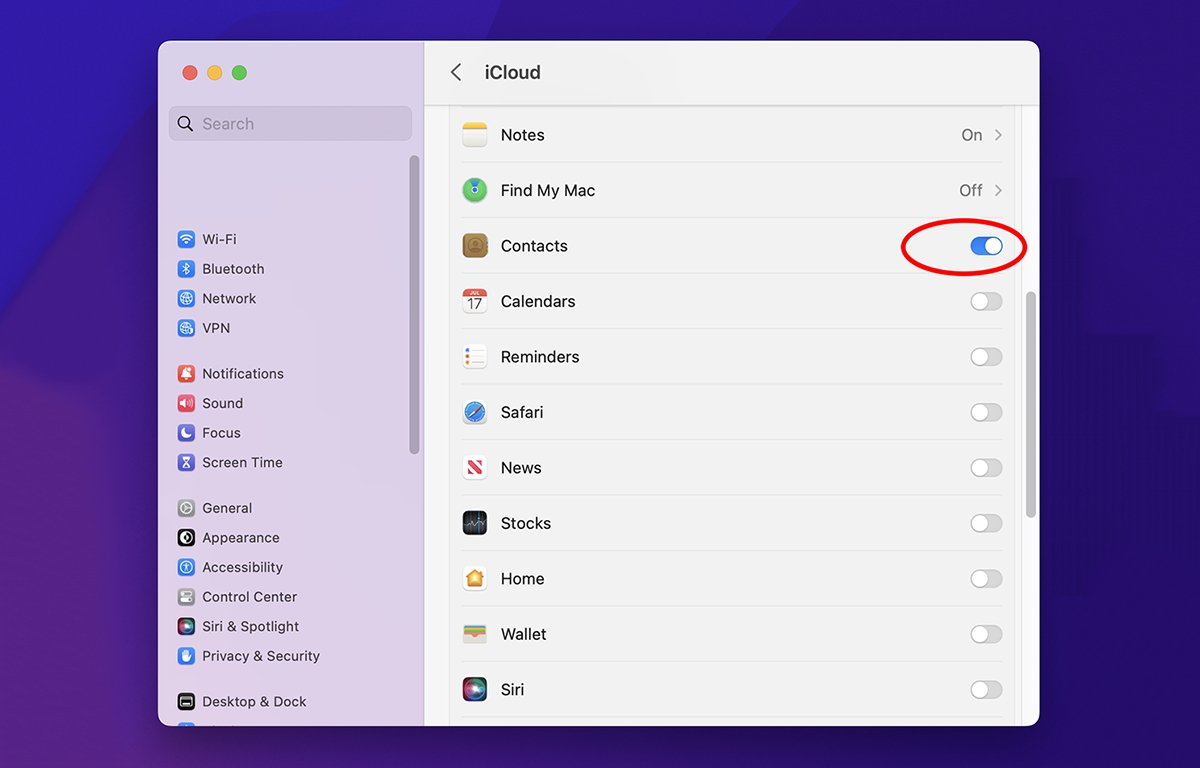
Scroll down to “Contacts” and turn its slider switch on. If you later want to access Contacts you saved in the app from iCloud on the web, you must also scroll to the bottom of the Settings iCloud pane and enable “Access iCloud Data on the Web.
Apple provides this safeguard to protect your iCloud data should a bad actor gain access to your web iCloud account.
Since you now know where the AddressBook folder lives in the ~/Library/Application Support folder, you can use a bash Terminal script to back it up automatically.
A full backup script is beyond the scope of this article, so we’ll just outline the bash shell commands you might put into a script to copy the entire AddressBook from ~/Library/Application Support to some other location on disk.
Be aware that bash scripts can be quite powerful and can destroy your data in an instant if errors are introduced into a script. Always test your scripts first on a machine that doesn’t contain any valuable files or data. Proceed at your own risk.
First, create a new empty .sh file in a text editor and save it to disk. Next, add a few variables to the top of the script which indicate where the user’s Library, Application Support, and AddressBook folders live. Also add variables to hold the name of the Startup Disk, the Users folder, and the currently logged-in user’s name:
VOL_NAME="/Volumes/Macintosh HD"
LIBRARY_DIR_NAME="Library"
APP_SUPPORT_DIR_NAME="Application Support"
ADDRESS_BOOK_DIR_NAME="AddressBook"
LIBRARY_APP_SUPPORT_DIR_PATH="${VOL_NAME}/${USERS_DIR_NAME}/${USER_DIR_NAME}/${LIBRARY_DIR_NAME}/${APP_SUPPORT_DIR_NAME}"
LIBRARY_ADDRESS_BOOK_DIR_PATH="${LIBRARY_APP_SUPPORT_DIR_PATH}/${ADDRESS_BOOK_DIR_NAME}"
The LIBRARY_APP_SUPPORT_DIR_PATH variable now contains the final full path to ~/Library/Application Support/
The LIBRARY_ADDRESS_BOOK_DIR_PATH variable contains the final full path to the AddressBook folder.
You’ll use the LIBRARY_ADDRESS_BOOK_DIR_PATH variable later to access the location of the AddressBook folder and copy the entire thing to some other destination location on disk.
To set up names and paths to copy the AddressBook folder to, add a few more variables to your script right below the ones listed above:
DEST_VOL_NAME="${VOL_NAME}" # Backup dest vol name
DEST_DIR_PATH="${VOL_NAME}/${USERS_DIR_NAME}/${USER_DIR_NAME}" # Backup dest dir path
In this example, we’ll use the Startup Disk as the destination volume as well, but you could use any mounted volume name, as long as it’s indicated by “/Volumes/
In this case, we’ll just use the user’s home folder as the destination folder in DEST_DIR_PATH.
Next, set variables to define the file paths to a few local Unix binary commands, namely echo, remove, and ditto. ditto is a macOS command which copies files and folders perfectly, including all their Unix user and group permissions, and all Access Control List settings, as well as any Mac-specific ownership and permissions:
Once all your variables are set up, it’s fairly easy to copy the entire AddressBook folder to the destination folder.
First, change the current directory to the destination folder using Unix’s cd command, then see if the AddressBook folder already exists there. If it does, remove it using the rm command, else print a message to Terminal:
if [ -d "${ADDRESS_BOOK_DIR_NAME}" ]; then
${REMOVE} -R "${ADDRESS_BOOK_DIR_NAME}"
${ECHO} "${ADDRESS_BOOK_DIR_NAME} not present."
The -d flag indicates you want to check for a directory. Be extremely careful when using the Unix rm command, especially with the -R flag which means “recursive”.
If your cd fails or if you end up in the wrong directory, the rm -R command will delete everything in the present working directory blindly, regardless of which directory it is.
This includes entire volumes, the system folder, the Desktop, the user folder, home folder, the Startup Disk or any other volume or directory. Worse, you won’t get any warning – your files will simply be gone instantly with no way to recover them.
For this reason, it’s always best to test your scripts on a secondary boot volume just in case something goes wrong. You might also want to disconnect any critical volumes from your Mac before running your script.
This is why you always want to check for the presence of the directory you’re deleting before running the rm command. A really good script would also check for the presence of any directory which the script tries to cd into – to be sure it exists.
If a directory you try to cd into from a script doesn’t exist, the present working directory will be the last one used. You won’t get any warning.
If you then run the rm -R command blindly, everything in the present working directory will be obliterated instantly. This is one of the gotchas Unix script newbies learn the hard way.
Next, change the current directory to the ~/Library/Application Support folder using Unix’s cd command again:
cd $"{LIBRARY_APP_SUPPORT_DIR_PATH}"
Check if the AddressBook folder exists in the Application Support folder, and if so copy it to the destination, if not, print an error to the Terminal:
if [ -d "${ADDRESS_BOOK_DIR_NAME}" ]; then
/usr/bin/sudo ${DITTO} -v -V — rsrc "${ADDRESS_BOOK_DIR_NAME}" "${DEST_DIR_PATH}"
${ECHO} "${ADDRESS_BOOK_DIR_NAME} not present."
The sudo command is short for “superuser do”. You’ll need to enter an admin password for a user on your Mac to proceed.
In Unix, a superuser is like the root user, both of which have nearly unlimited permissions to do anything on the machine they wish.
The — rsrc flag tells the ditto command to also copy any old-style Mac OS 9 resource forks which may be found in any copied files. In this case you probably don’t need — rsrc, but it won’t hurt.
Save the script file. To run the script, open macOS’s Terminal app, drag the script file to the Terminal window and press Return.
The script will start running and echo progress to the Terminal as it proceeds.
If everything went according to plan, you now have an exact copy of the AddressBook folder inside your current user’s home folder. As mentioned, you could copy the AddressBook folder to any other location by changing the path stored in $”{DEST_DIR_PATH}.
Automated backup scripts can get quite complex and you can automate just about any file operation in the bash Terminal shell. We could have simplified this script by combining some of the variables, and by nesting the if/else statements but the example should be easy enough to understand.
We could also export the Contacts archive from the app using AppleScript, then back up the exported .abbu file also from the bash script – something we may cover in a future article.
In a future article, we’ll also look at ways to back up Contacts from your iPhone or iPad.
This story originally appeared on Appleinsider